In this post, I will introduce a few tools that facilitate the creation and maintenance of Markdown source files that are intended to be shown on GitHub. There are a number of Markdown variants, including some with very neat features like automatically generated tables of content. However, I’m going to focus on tools that are ideally suited for GitHub Flavored Markdown (GFM).
I saved the best for last.
Note: the risk of using any editing tools that support extensions to Markdown beyond GFM is that you include these extensions in your Markdown. For example, some flavors of Markdown support [TOC] and will automatically generate a table of contents in its place when rendered. GFM does not support this, so you will see the actual characters [TOC] in your page and not a table of contents – you probably don’t want that.
NEW RESEARCH: LEARN HOW DECISION-MAKERS ARE PRIORITIZING DIGITAL INITIATIVES IN 2024.
Introduction
Over the years I’ve starred a couple hundred repositories on GitHub. One thing I notice about the vast majority of these and others I view there is that many have long involved README.md files but have no Wiki pages at all.
I don’t see people write much about how they create their README.md files or maintain their Wiki pages. I do know my own experience is that my README.md file for SilkJS started out with just a paragraph or two, and then I added to it over time. The Wiki had a similar evolution.
In creating the Markdown files, I basically just used my editor or IDE. Markdown syntax is close to natural language, but you really don’t know what your text will look like on GitHub until you commit your Markdown file edits and look at it rendered in your browser. For example, when you Markdown source contains:
This is a title
===============
It shows up as:
This is a title
in your browser.
The development cycle described so far is rather awkward and time consuming. You edit, commit, push, reload, repeat – until you’re satisfied with your results. At the same time, your commit history becomes filled with
“tweak README.md” type messages, when you really are doing one big edit to README.md and one logical commit. You are also subjecting potential visitors to your repository with in-process edits to your Markdown files.
Editing on GitHub
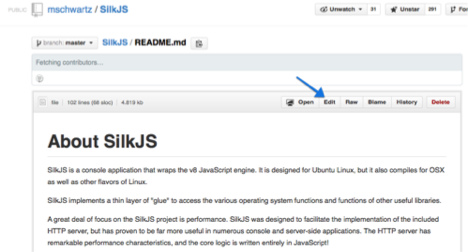
GitHub does provide some in-browser editing features, which are an improvement. Here I’ve clicked on the README.md file link in the SilkJS repository. Note there is an “Edit” button above the display.
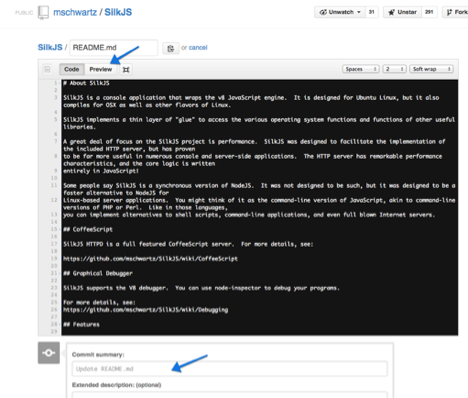
Clicking on this button opens the file in an in-browser editor (Ace Editor) where you can edit your Markdown source. Above the editor is a “Preview” button so you can toggle between editing your Markdown and seeing what it’s going to look like once you save and commit. Notice there is a form below the editor required to commit and save your changes.
This is fine, but on line 26 there is a link to a page on the SilkJS Wiki. What if I haven’t written that page yet? What if that page needs editing before I really want to commit changes to this README.md file?
Editing Wiki pages on GitHub is a different experience.
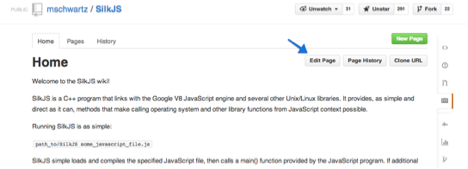
From the Wiki page you want to edit, click on the “Edit Page” button and you get a very different editor:
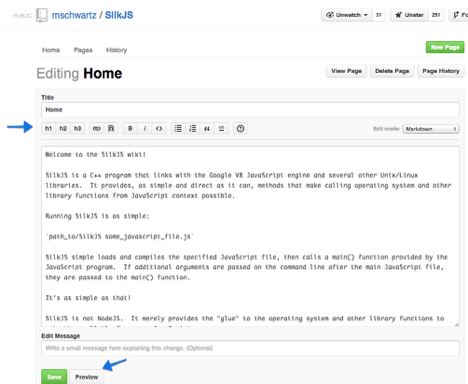
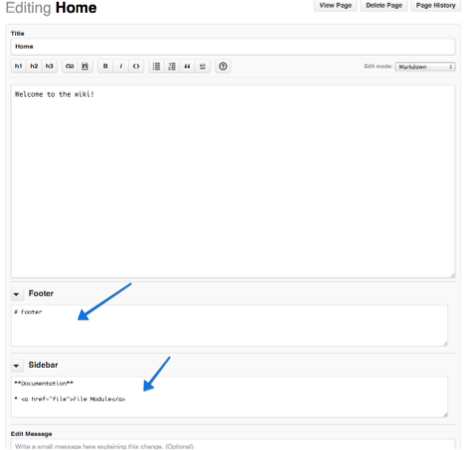
That’s not the Ace editor with all its editor friendly features, but something looking like a plain old textarea. There’s a tool bar at the top to help insert Markdown codes. The form at the bottom doesn’t have the “commit summary” text field. The “Preview” button is at the bottom, below the editor, which means you might have to scroll down to click on it to see if your Markdown renders as you really want it.
The same issue applies where you may want to save related pages in one operation.
Use git to clone your GitHub Wiki!
What may not be all that well known is that not only can you git clone a repository, but you can also git clone that repository’s Wiki.
If you have commit rights to a repository, you can clone it and its Wiki and edit locally and then commit and push related files in one operation.
For example, to clone the SilkJS repository, I use this command:
$ git clone git@github.com:mschwartz/SilkJS.git src
To clone its wiki, I use this command:
$ git clone git@github.com:mschwartz/SilkJS.wiki.git wiki
Notice the .wiki.git at the end.
I now have two directories: src/ and wiki/. If I edit in src/, commit, and push, the SilkJS repository is updated. If I edit in wiki/, commit, and push, the Wiki is updated.
With the ability to edit locally and use git tools to push our changes live to the Wiki, we are now faced with how to preview our changes before we push our changes live.
One approach would be to use the text editor of our choice to edit the Markdown source, then somehow view the results in a WWW browser. There are two options here: paste our edited Markdown source into an online Markdown viewer, or to run some sort of Wiki software on a local WWW server that renders the Markdown to HTML for our browser.
WWW solutions
There are a plethora of WWW sites that allow you to paste Markdown source into a textarea that will render and show you the result, side by side. You can edit the source on the left and see the rendered view on the right change. When satisfied with the result, you copy from the textarea and paste back into your editor and save. Or you edit in the editor, and repeatedly paste into the textarea until satisfied. I find this to be a lot of extra work and it is error prone, and simply not ideal.
There is a second class of these WWW sites that implement a side-by-side editor and previewer along with publishing capabilities. One example is StackEdit.
StackEdit
StackEdit is feature rich:
- It uses Ace for its text editor. This is one of the best in-browser text editors around these days.
- Synchronized scrolling between the left (Ace) and right (preview) views. The scrolling is properly done; what you edit on the left is in view on the right.
- It supports numerous publishing options, including to GitHub.
- It supports a superset of Markdown, including GFM.
- It supports editing multiple documents at once.
My gripes with StackEdit are that it saves your documents in your browser’s local storage and that you have to authorize their site to access your GitHub repositories with write access. Local storage is limited in size per URL, and you can clear it by accident thus losing your files. You also can only edit those files on the machine with the browser/local storage. As far as granting anyone or any site write access to my repositories: no thanks.
Gollum
In terms of locally hosted server solutions, I could only really find one: Gollum. It is the actual Wiki server used by GitHub. Unfortunately, I could not get it to install on my Mac, likely do to the wrong version of Ruby installed or some other incompatibility.
I really didn’t care to try to get it to install, but I can address what value I think it would provide. Since it is the actual software used by GitHub, you will be truly seeing your Markdown rendered as you would see it on GitHub. It also might be a great Wiki to use for some site you are working on that needs a Wiki.
Beyond these two things, I was able to glean from the sources a couple of undocumented (or hard to find documentation for) features of the GitHub Wikis.
If you create a file named _Sidebar.md, it will be rendered on the right side of your Wiki page. You can organize your Wiki pages in subdirectories, each with its own _Sidebar.md file.
If you create a file named _Footer.md, it will be rendered at the bottom of your Wiki page. It also works by subdirectory as _Sidebar.md does.
Interestingly, the online Wiki editor on GitHub can deal with these files, but I don’t see an obvious way to create them (within subdirectories, etc.). In my previous screen shot of the Wiki editor, there were no parts of the editor related to sidebar and footer.
I simply created the _Footer.md and _Sidebar.md files in my wiki/ directory, committed, and pushed and they showed up and worked on the GitHub Wiki.
Editor Plugins
If you want to edit in your favorite editor and just push your changes to GitHub to see them take effect, there are Markdown plugins likely available. There are also standalone preview applications (for the Mac) that you can use in conjunction with your editor to see that what you mean is what you get.
I tried the Markdown modes for some editors that I own, such as TextMate and TextWrangler, but my experience was not very exciting. Simple syntax highlighting of the Markdown source was all I could see as a benefit of using these.
Sublime Text and Marked
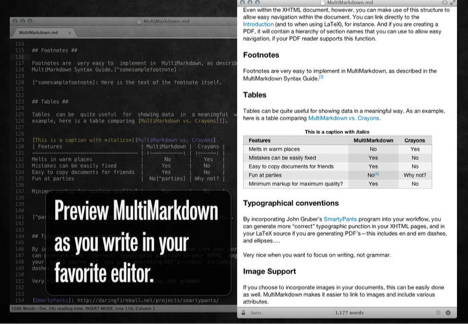
For Sublime Text, there is the MarkdownEditing package. This adds some smart parsing of Markdown source and use of syntax highlighting. It’s not exactly WYSIWYG, but bold text is bold, and so on. It’s still editing Markdown source code. You can also install a plugin to preview your Markdown in the Marked app ($3.99 in the App Store).
I did not install and try Marked because the comments on App Store indicate that it requires Ruby, I already had issues with Gollum and Ruby, and I wasn’t willing to risk the $3.99 for software that isn’t exactly what I’m looking for. I can say that the app is highly rated in the App Store by its users, so it probably is very good.
vim
For vim, there are at least two Markdown plugins: vim-Markdown and vim-instant-Markdown. The former provides syntax highlighting and matching for Markdown in vim. The second is more interesting because it displays your Markdown source rendered as HTML in your browser which is updated automatically as you type. The downside is that ruby is required as well as nodejs and other dependencies (ruby gems and node modules).
JetBrains
For the JetBrains IDEs, there is a Markdown plugin you can install via the plugin manager. I did this and I could see no difference in the editing experience. The Markdown file had no syntax highlighting in the editor, and no obvious other features like a preview button to see the rendered version in a browser. It really wasn’t worth the 30+ minutes I spent using google to search for a solution (to it not apparently doing anything) without luck.
Dedicated Apps
I looked at a handful of both paid and free stand-alone Mac apps specifically designed toward editing Markdown. These did not require that I manually install, configure, etc., any languages like Ruby or install any gems or other dependencies. Just download and install like a traditional Mac app and they work.
I’ll review several here.
Some have features that are really slick, but aren’t relevant to making GitHub Markdown. For example, some have the ability to save the rendered version as PDF or other formats.
MouApp
The first Markdown editor I used, and I generated quite a bit of text with it, is MouApp. You can download it here: http://mouapp.com
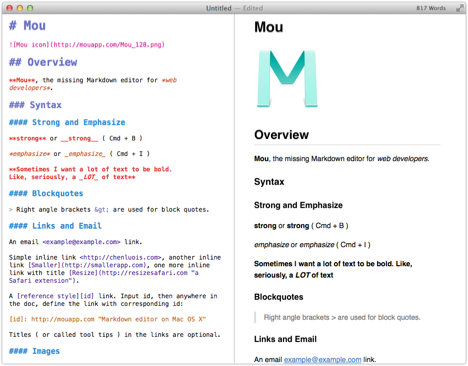
As you can see, it is a side-by side editor where you edit Markdown syntax on the left and see it update in realtime on the right. As you scroll the left pane, the right stays in sync by scrolling so what you view and edit is displayed. The Markdown is more dense so it is possible to have more source on the left than can fit on the right, and in that case you can edit what isn’t being displayed (above or below).
I could not find any GFM support in the application at all, otherwise it would be about as good as I could ask for. In the preferences, it does allow you to select GitHub CSS for the right pane display, but there are critical GFM features missing. It does not, for example, support syntax highlighting for programming languages, and we all want to document programming languages and examples on GitHub!
When I published Markdown files I created with MouApp to GitHub, they did not look right, and I had to go and tweak the Markdown source to get the effect I really desired. MouApp simply failed to really show me what I’d get, but it was a 90% solution.
Erato
I paid $5.99 in the App Store to buy Erato, which claims to support GFM.
I was sorely disappointed that there is no syntax highlighting of the JavaScript source in the rendered display on the right. However, it does not destroy the display as MouApp did (showing the word javascript on the right). The syntonization of scrolling between the left pane and right is not very good. For long documents, you can almost get the two showing entirely different parts of the document.
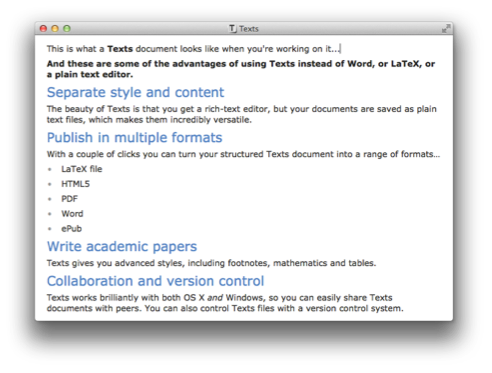
Texts
I tried an app called Texts which is supposed to be a WYSIWYG editor that creates Markdown source files.
The WWW site boasts of a number of features that are excellent for general purpose Markdown use, but does not mention GFM. It’s pricey at $14.50 at 50% discount on their site, but they do have a trial version so I gave it a spin. It loaded my existing Markdown text files but the rendering was not even close to any of the other solutions, and certainly not right.
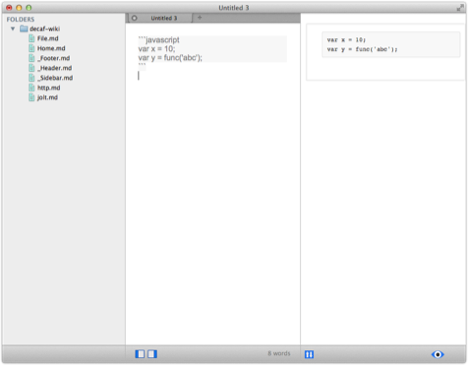
LightPaper
Another app I tried is LightPaper.
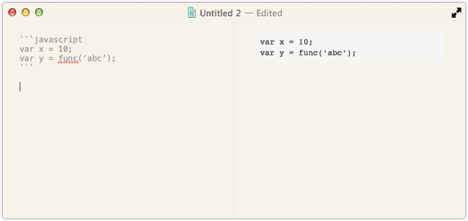
Their site claims they support GFM fenced blocks, but it turns out the app doesn’t support syntax highlighting. This is the only app I tried that has the tabbed document interface (multiple tabs, multiple documents). It also has the nice project/directory selector on the left. Otherwise, the application fell far short of my hopes. As you can see in the screen shot, it does not do syntax highlighting of my JavaScript. Also, when I loaded a very large/long Markdown file, the left and right pane synchronization failed badly.
I saved the best for last, like promised!
HarooPad is the best Markdown editor application that I have found so far.
It is not specifically a Mac styled app, but it is hard to tell while you’re using it. It only really shows in the preferences dialog and that preferences is selected from the File menu like a Windows app.
It looks like a one-man project and a lot of the online documentation is in either Korean or Chinese (I can’t tell).
However, the application simply does what I want it to do: open files, render them properly, support GFM and syntax highlighting, and scroll left and right panes correctly. It does all these things and supports themes for the left and right panes; for example, Solarized for the editor (left) and GitHub for the preview (right).
Conclusion
Now that you know about cloning your repository’s wiki and HarooPad, you have the tool and the knowledge to get more from what GitHub has to offer.
Mike Schwartz
Related Posts
-
Profit Sharing Creates Sustainable & Independent Open Source
Successful IT leaders understand that Open Source Software allows them to deliver unique digital experiences…
-
Ext JS to React: Migration to Open Source
Worried about Migrating from Ext JS? Modus has the Answers Idera’s acquisition of Sencha has…

